Advance Java - Unit2.Introduction To Swing Technology
Swing Packages Should I Use?
Most of the code uses only one or two Swing packages:
javax.swingjavax.swing.event(not always required)
1. More on Swing's JComponents
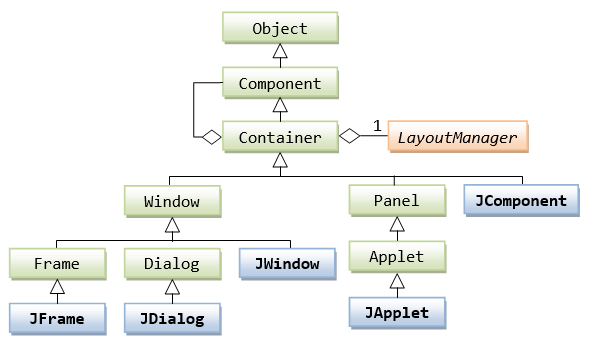
The class hierarchy of Swing's top-level containers (JFrame, JDialog, JApplet) are as follows. These top-level Swing
containers are heavyweight, that rely on the underlying windowing subsystem of the native platform.
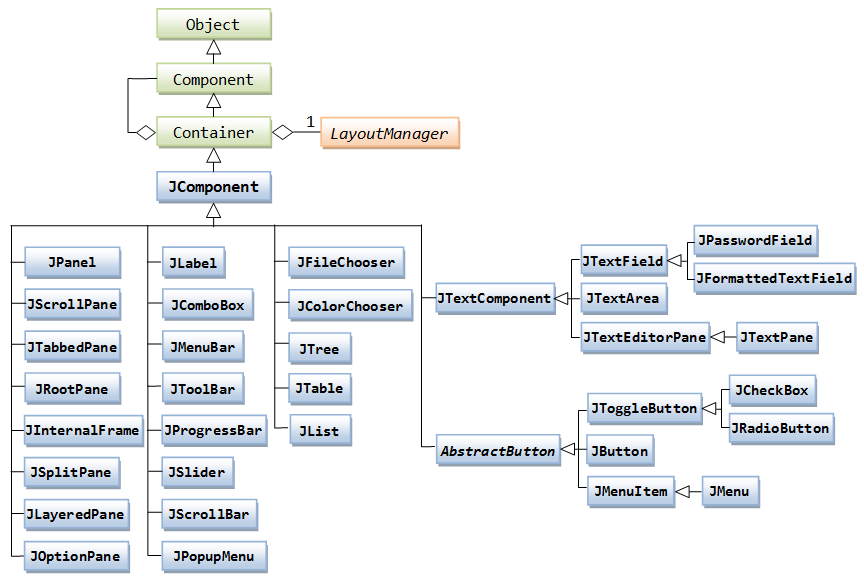
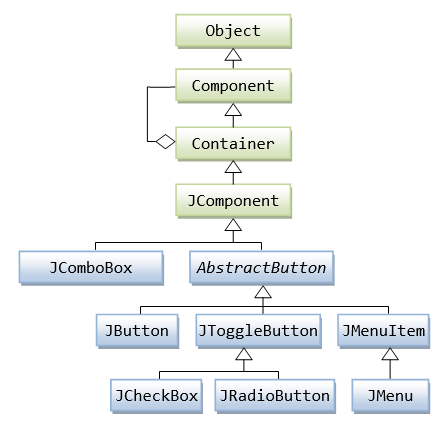
The class hierarchy of Swing's JComponents is as follows. JComponent and its descendants are lightweight components.
1.1 ImageIcon

Many Swing's JComponents (such as JLabel and JButton) support a text label and an image icon. For example, the figure shows three buttons: one with text label, one with an image icon, and one with both text and icon.
The javax.swing.ImageIcon class models an image icon. An ImageIcon is a fixed-size picture, typically small, and mainly used for decorating GUI components. The ImageIcon class implements javax.swing.Icon interface, and hence, often upcasted and referenced as Icon.
To construct an ImageIcon, provide the image filename or URL. Image file type of GIF, PNG, JPG and BMP are supported. For example,
// Construct an ImageIcon from an image filename
String imgFilename = "images/duke.png";
      // Can use an absolute filename such as "c:/project/images/nought.gif"
ImageIcon iconDuke = new ImageIcon(imgFilename);

// OR
// Construct an ImageIcon via an image URL (in the form of file://path/filename)
ImageIcon iconDuke = null;
String imgFilename = "images/duke.png";
java.net.URL imgURL = getClass().getClassLoader().getResource(imgFilename);
      // Filename always relative to the root of the project (i.e., bin)
      // can access resource in a JAR file
if (imgURL != null) {
   iconDuke = new ImageIcon(imgURL);
} else {
   System.err.println("Couldn't find file: " + imgFilename);
}
Using URL is more flexible as it can access resources in a JAR file, and produces an error message if the file does not exist (which results in a null URL).
Many JComponents (such as JLabel, JButton) accepts an ImageIcon in its constructor, or via the setIcon() method. For example,
ImageIcon iconDuke = null;
String imgFilename = "images/duke.gif";  // relative to project root (or bin)
URL imgURL = getClass().getClassLoader().getResource(imgFilename);
if (imgURL != null) {
   iconDuke =  new ImageIcon(imgURL);
} else {
   System.err.println("Couldn't find file: " + imgFilename);
}

JLabel lbl = new JLabel("The Duke", iconDuke, JLabel.CENTER);
lbl.setBackground(Color.LIGHT_GRAY);
lbl.setOpaque(true);

Container cp = getContentPane();
cp.add(lbl);
An ImageIcon uses an java.awt.Image object to hold the image data. You can retrieve this Image object via the ImageIcon's getImage() method. The Image object is used in the drawImage() method for custom drawing (which shall be discussed later).
1.2 Setting the Appearances and Properties of JComponents
Most of the Swing Components supports these features:
- Text and icon.
- Keyboard short-cut (called mnemonics), e.g., activated via the "Alt" key in Windows System.
- Tool tips: display when the mouse-pointer pauses on the component.
- Look and feel: customized appearance and user interaction for the operating platform.
- Localization: different languages for different locale.
All JComponents (such as JPanel, JLabel, JTextField and JButton) support these set methods to set their appearances and properties:
// javax.swing.JComponent
public void setBackground(Color bgColor)
   // Sets the background color of this component
public void setForeground(Color fgcolor)
   // Sets the foreground (text) color of this component
public void setFont(Font font)
   // Sets the font used by this component
public void setBorder(Border border)
   // Sets the border for this component
public void setPreferredSize(Dimension dim)
public void setMaximumSize(Dimension dim)
public void setMinimumSize(Dimension dim)
   // Sets the preferred, maximum or minimum size of this component.
public void setOpaque(boolean isOpaque)
   // If true (opaque), fill the background with background color;
   // otherwise, enable transparent background.
   // Most of the JComponents have default of true, except JLabel.
public void setToolTipText(String toolTipMsg)
   // Sets the tool-tip message, to be displayed when the mouse-pointer pauses over the component.
Swing's JLabel and buttons (AbstractButton subclasses): support both text and icon, which can be specified in the constructor or via the setters.
// javax.swing.JLabel, javax.swing.AbstractButton
public void setText(String strText)
   // Set the text
public void setIcon(Icon defaultIcon)
   // Set the button's default icon (you can have different icons for "pressed" and "disabled" states)
public void setHorizontalAlignment(int alignment)
   // Set the horizontal alignment of icon and text
   // SwingConstants.RIGHT, SwingConstants.LEFT, SwingConstants.CENTER
public void setVerticalAlignment(int alignment)
   // Set the vertical alignment of icon and text,
   // SwingConstants.TOP, SwingConstants.BOTTOM, SwingConstants.CENTER
public void setHorizontalTextPosition(int textPosition)
   // Set the horizontal text position relative to icon
   // SwingConstants.RIGHT, SwingConstants.LEFT, SwingConstants.CENTER, SwingConstants.LEADING, SwingConstants.TRAILING.
public void setVerticalTextPosition(int textPosition)
   // Set the vertical text position relative to icon
   // SwingConstants.TOP, SwingConstants.BOTTOM, SwingConstants.CENTER
JTextField supports:
// javax.swing.JTextField, javax.swing.JLabel, javax.swing.AbstractButton
public void setHorizontalAlignment(int alignment)
   // Set the text's horizontal alignment: JTextField.LEFT, JTextField.CENTER
   //    JTextField.RIGHT, JTextField.LEADING, JTextField.TRAILING
   // No setVerticalAlignment as text field is single-line
Swing's buttons support mnemonic (to be triggered via keyboard short-cut with alt key).
// javax.swing.AbstractButton
public void setMnemonic(int mnemonic)
   // Set the keyboard mnemonic (i.e., the alt short-cut key).
   // Use KeyEvent.VK_xxx to specify the key.
Example
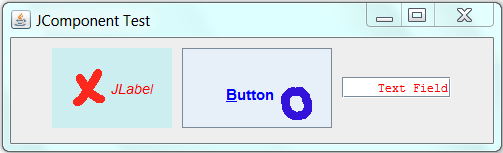
This example creates 3 JComponents: a JLabel, a JTextField and a JButton, and sets their appearances (background and foreground colors, font, preferred size and opacity). It also sets the horizontal text alignment for the JTextField.
Images:


1 2 3 4 5 6 7 8 9 10 11 12 13 14 15 16 17 18 19 20 21 22 23 24 25 26 27 28 29 30 31 32 33 34 35 36 37 38 39 40 41 42 43 44 45 46 47 48 49 50 51 52 53 54 55 56 57 58 59 60 61 62 63 64 65 66 67 68 69 70 71 72 73 74 75 76 77 78 79 80 81 82 83 84 85 86 87 88 89 90 91 92 | import java.awt.*; import java.awt.event.*; import java.net.URL; import javax.swing.*; /** Test setting Swing's JComponents properties and appearances */ @SuppressWarnings("serial") public class SwingJComponentSetterTest extends JFrame { // Image path relative to the project root (i.e., bin) private String imgCrossFilename = "images/cross.gif"; private String imgNoughtFilename = "images/nought.gif"; /** Constructor to setup the GUI */ public SwingJComponentSetterTest() { // Prepare ImageIcons to be used with JComponents ImageIcon iconCross = null; ImageIcon iconNought = null; URL imgURL = getClass().getClassLoader().getResource(imgCrossFilename); if (imgURL != null) { iconCross = new ImageIcon(imgURL); } else { System.err.println("Couldn't find file: " + imgCrossFilename); } imgURL = getClass().getClassLoader().getResource(imgNoughtFilename); if (imgURL != null) { iconNought = new ImageIcon(imgURL); } else { System.err.println("Couldn't find file: " + imgNoughtFilename); } Container cp = getContentPane(); cp.setLayout(new FlowLayout(FlowLayout.CENTER, 10, 10)); // Create a JLabel with text and icon and set its appearances JLabel label = new JLabel("JLabel", iconCross, SwingConstants.CENTER); label.setFont(new Font(Font.DIALOG, Font.ITALIC, 14)); label.setOpaque(true); // needed for JLabel to show the background color label.setBackground(new Color(204, 238, 241)); // light blue label.setForeground(Color.RED); // foreground text color label.setPreferredSize(new Dimension(120, 80)); label.setToolTipText("This is a JLabel"); // Tool tip cp.add(label); // Create a JButton with text and icon and set its appearances JButton button = new JButton(); // use setter to set text and icon button.setText("Button"); button.setIcon(iconNought); button.setVerticalAlignment(SwingConstants.BOTTOM); // of text and icon button.setHorizontalAlignment(SwingConstants.RIGHT); // of text and icon button.setHorizontalTextPosition(SwingConstants.LEFT); // of text relative to icon button.setVerticalTextPosition(SwingConstants.TOP); // of text relative to icon button.setFont(new Font(Font.SANS_SERIF, Font.BOLD, 15)); button.setBackground(new Color(231, 240, 248)); button.setForeground(Color.BLUE); button.setPreferredSize(new Dimension(150, 80)); button.setToolTipText("This is a JButton"); button.setMnemonic(KeyEvent.VK_B); // can activate via Alt-B (buttons only) cp.add(button); // Create a JTextField with text and icon and set its appearances JTextField textField = new JTextField("Text Field", 15); textField.setFont(new Font(Font.DIALOG_INPUT, Font.PLAIN, 12)); textField.setForeground(Color.RED); textField.setHorizontalAlignment(JTextField.RIGHT); // Text alignment textField.setToolTipText("This is a JTextField"); cp.add(textField); setDefaultCloseOperation(JFrame.EXIT_ON_CLOSE); setTitle("JComponent Test"); setLocationRelativeTo(null); // center window on the screen setSize(500, 150); // or pack() setVisible(true); // Print description of the JComponents via toString() System.out.println(label); System.out.println(button); System.out.println(textField); } /** The entry main() method */ public static void main(String[] args) { // Run the GUI codes on Event-Dispatching thread for thread safety SwingUtilities.invokeLater(new Runnable() { @Override public void run() { new SwingJComponentSetterTest(); // Let the constructor do the job } }); } } |
1.5 Text Components: JTextField, JTextArea, JEditorPane
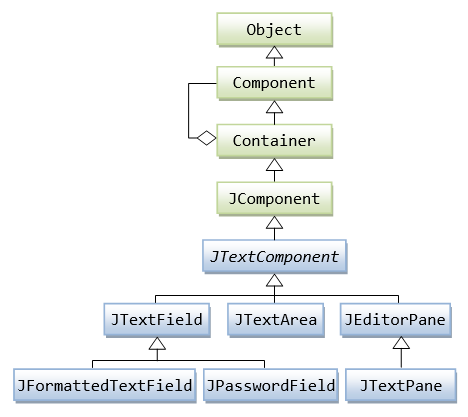
Swing provides 6 text components, as shown in the above class diagram. All text components extends from JTextComponent.
JTextField: For displaying only one line of editable text. Like buttons, they triggerActionEventwhen user hits the "enter" key.JTextArea: Plain text area for displaying multiple lines of editable text, unformatted. All the texts are in the same font.
1.6 Buttons and ComboBox: JButton, JCheckBox, JRadioButton, JComboBox
Read: Swing Tutorial's "How to Use Buttons, Check Boxes, and Radio Buttons".
A user can click a button (or a menu item) to trigger a specific action. Swing supports mouse-less operations, where user could use a keyboard short-cut (called mnemonic) to activate the action.
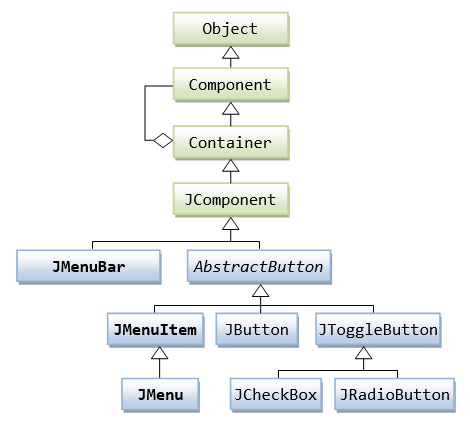
Buttons and menu-items are inherited from AbstractButton, as shown in the class diagram.
You could place a text string (called button's label) as well as an icon on the button. You could use different icons for different button states: defaultIcon, disabledIcon, pressedIcon, selectedIcon, rolloverIcon, disabledSelectedIcon, rolloverSelectedIcon. The defaultIcon can be set via the constructor or setIcon() method. The other icons can be set via setXxxIcon() methods. You can set the alignment of text and button via setHorizontalAlignment() and setVerticalAlignment() methods. You can set the position of the text relative to the icon via setHorizontalTextPosition() and setVerticalTextPosition().
Swing supports many type of buttons.
Command Buttons: JButton
Click to fires an ActionEvent to all its registered ActionListeners.
Toggle Buttons: JRadioButton, JCheckBox, JToggleButton
Toggle buttons are two-state buttons: SELECTED or DESELECTED.
For radio button, you can choose none or one among the group. JRadioButtons are typically added into a ButtonGroup to ensure exclusive selection. JRadioButton fires ItemEvent to its ItemListeners. It also fires ActionEvent to its ActionListeners. Both ItemEvent and ActionEvent can be used.
For checkboxes, you can choose none or more among the group. JCheckBoxes fire ItemEvent as well as ActionEvent. We typically use ItemEvent as we may need to distinguish between item-states of SELECTED and DESELECTED.
The ItemListner (of ItemEvent) declares one abstract method itemStateChanged(ItemEvent e).
JComboBox
JComboBox can be used to provide a drop-down menu. It supports single-selection and multiple-selection. JComboBox receives a Object array (typically a String array), which provides the items in the drop-down list. JComboBox fires ItemEvent. We could use JComboBox's getSelectedIndex() to get the index of the selected item; or getSelectedItem() to get the selected Object. JComboBox also fires ActionEvent.
Example on JButton, JRadioButton and JComboBox
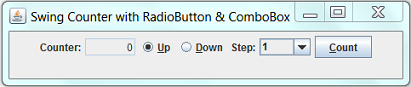
In this example, we shall modify our counter application to include two radio buttons for specifying counting up/down, and a combo-box to select the count-step size.
1 2 3 4 5 6 7 8 9 10 11 12 13 14 15 16 17 18 19 20 21 22 23 24 25 26 27 28 29 30 31 32 33 34 35 36 37 38 39 40 41 42 43 44 45 46 47 48 49 50 51 52 53 54 55 56 57 58 59 60 61 62 63 64 65 66 67 68 69 70 71 72 73 74 75 76 77 78 79 80 81 82 83 84 85 86 87 88 89 90 91 92 93 94 95 96 | import java.awt.*; import java.awt.event.*; import javax.swing.*; /** Counter with JRadioButton and JComboBox */ @SuppressWarnings("serial") public class SwingCounterRadioCombo extends JFrame { private JTextField tfCount; private int count = 0; // counter's value private boolean countingUp = true; // counting up or down private int step = 1; // increment step size /** Constructor to setup the UI */ public SwingCounterRadioCombo () { Container cp = getContentPane(); cp.setLayout(new FlowLayout()); // Create JLabel and JTextField cp.add(new JLabel("Counter:")); tfCount = new JTextField("0", 5); tfCount.setEditable(false); tfCount.setHorizontalAlignment(JTextField.RIGHT); cp.add(tfCount); // Create JRadioButton for counting up and down JRadioButton rbUp = new JRadioButton("Up", true); rbUp.setMnemonic(KeyEvent.VK_U); cp.add(rbUp); rbUp.addActionListener(new ActionListener() { @Override public void actionPerformed(ActionEvent e) { countingUp = true; } }); JRadioButton rbDown = new JRadioButton("Down", true); rbDown.setMnemonic(KeyEvent.VK_D); cp.add(rbDown); rbDown.addActionListener(new ActionListener() { @Override public void actionPerformed(ActionEvent e) { countingUp = false; } }); // Setup a ButtonGroup to ensure exclusive selection ButtonGroup btnGp = new ButtonGroup(); btnGp.add(rbUp); btnGp.add(rbDown); // Create JComboBox for setting the count step size add(new JLabel("Step:")); final Integer[] steps = {1, 2, 3, 4, 5}; // auto-upcast final JComboBox<Integer> comboCount = new JComboBox<Integer>(steps); comboCount.setPreferredSize(new Dimension(60, 20)); cp.add(comboCount); comboCount.addItemListener(new ItemListener() { @Override public void itemStateChanged(ItemEvent e) { if (e.getStateChange() == ItemEvent.SELECTED) { step = (Integer)comboCount.getSelectedItem(); } } }); // Create JButton for "Count" JButton btnCount = new JButton("Count"); btnCount.setMnemonic(KeyEvent.VK_C); cp.add(btnCount); btnCount.addActionListener(new ActionListener() { @Override public void actionPerformed(ActionEvent e) { if (countingUp) { count += step; } else { count -= step; } tfCount.setText(count + ""); } }); setDefaultCloseOperation(JFrame.EXIT_ON_CLOSE); setTitle("Swing Counter with RadioButton & ComboBox"); setSize(480, 100); setVisible(true); } /** The entry main() method */ public static void main(String[] args) { // Run the GUI codes in the Event-Dispatching thread for thread-safety SwingUtilities.invokeLater(new Runnable() { @Override public void run() { new SwingCounterRadioCombo(); // Let the constructor do the job } }); } } |
1.7 Menu-Bar: JMenuBar, JMenu, JMenuItem
The menu-bar is at the same level as the content-pane (of the top-level container JFrame). It is set via the JFrame's setJMenuBar() method (similar to setContentPane()).
To create a menu-bar, construct a JMenuBar. A menu-bar (JMenuBar) contains menu (JMenu). A menu contains menu-item (JMenuItem). JMenuItem is a subclass of AbstractButton, similar to JButton. JMenuItem fires ActionEvent upon activation to all its registered ActionListener.
Example
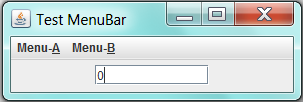
This menu-bar contains 2 menus (Menu-A and Menu-B). Menu-A contains 2 menu-items (Up and Down). Menu-B has 1 menu-item (Reset).
1 2 3 4 5 6 7 8 9 10 11 12 13 14 15 16 17 18 19 20 21 22 23 24 25 26 27 28 29 30 31 32 33 34 35 36 37 38 39 40 41 42 43 44 45 46 47 48 49 50 51 52 53 54 55 56 57 58 59 60 61 62 63 64 65 66 67 68 69 70 71 72 73 74 75 76 77 78 79 80 81 82 83 | import java.awt.*; import java.awt.event.*; import javax.swing.*; /** Testing menu-bar of JFrame */ public class TestJMenuBar extends JFrame { JTextField display; int count = 0; /** Constructor to setup the GUI */ public TestJMenuBar() { // A menu-bar contains menus. A menu contains menu-items (or sub-Menu) JMenuBar menuBar; // the menu-bar JMenu menu; // each menu in the menu-bar JMenuItem menuItem; // an item in a menu menuBar = new JMenuBar(); // First Menu menu = new JMenu("Menu-A"); menu.setMnemonic(KeyEvent.VK_A); // alt short-cut key menuBar.add(menu); // the menu-bar adds this menu menuItem = new JMenuItem("Up", KeyEvent.VK_U); menu.add(menuItem); // the menu adds this item menuItem.addActionListener(new ActionListener() { @Override public void actionPerformed(ActionEvent e) { ++count; display.setText(count + ""); } }); menuItem = new JMenuItem("Down", KeyEvent.VK_D); menu.add(menuItem); // the menu adds this item menuItem.addActionListener(new ActionListener() { @Override public void actionPerformed(ActionEvent e) { --count; display.setText(count + ""); } }); // Second Menu menu = new JMenu("Menu-B"); menu.setMnemonic(KeyEvent.VK_B); // short-cut key menuBar.add(menu); // the menu bar adds this menu menuItem = new JMenuItem("Reset", KeyEvent.VK_R); menu.add(menuItem); // the menu adds this item menuItem.addActionListener(new ActionListener() { @Override public void actionPerformed(ActionEvent e) { count = 0; display.setText(count + ""); } }); setJMenuBar(menuBar); // "this" JFrame sets its menu-bar Container cp = getContentPane(); cp.setLayout(new FlowLayout()); display = new JTextField("0", 10); cp.add(display); setDefaultCloseOperation(JFrame.EXIT_ON_CLOSE); setTitle("Test MenuBar"); setSize(300, 100); setVisible(true); } /** The entry main() method */ public static void main(String[] args) { // Run the GUI codes on the event-dispatching thread for thread safety SwingUtilities.invokeLater(new Runnable() { @Override public void run() { new TestJMenuBar(); // Let the constructor do the job } }); } } |
Event-Handling
Both AWT and Swing applications uses the AWT event-handling classes (in package java.awt.event). Swing added a few new event handling classes (in package javax.swing.event), but they are not frequently used.
AWT GUI Components (such as Button, TextField, and Window) can trigger an AWTEvent upon user’s activation.
| User Action | Event Triggered | Event Listener interface |
|---|---|---|
Click a Button, JButton | ActionEvent | ActionListener |
Open, iconify, close Frame, JFrame | WindowEvent | WindowListener |
Click a Component, JComponent | MouseEvent | MouseListener |
Change texts in a TextField, JTextField | TextEvent | TextListener |
| Type a key | KeyEvent | KeyListener |
Click/Select an item in a Choice, JCheckbox, JRadioButton, JComboBox | ItemEvent, ActionEvent | ItemListener, ActionListener |
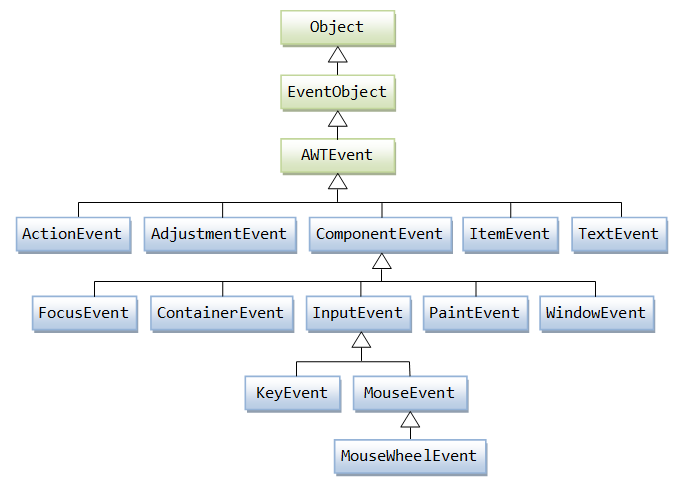
The subclasses of AWTEvent are as follows:
Source, Event and Listener Objects
The AWT's event-handling classes are kept in package java.awt.event.
Three kinds of objects are involved in the event-handling: a source, listener(s) and an event object.
The source object (such as Button and Textfield) interacts with the user. Upon triggered, the source object creates an event object to capture the action (e.g., mouse-click x and y, texts entered, etc). This event object will be messaged to all the registered listener object(s), and an appropriate event-handler method of the listener(s) is called-back to provide the response. In other words, triggering a source fires an event to all its listener(s), and invoke an appropriate event handler of the listener(s).
To express interest for a certain source's event, the listener(s) must be registered with the source. In other words, the listener(s) "subscribes" to a source's event, and the source "publishes" the event to all its subscribers upon activation. This is known as subscribe-publish or observable-observer design pattern.
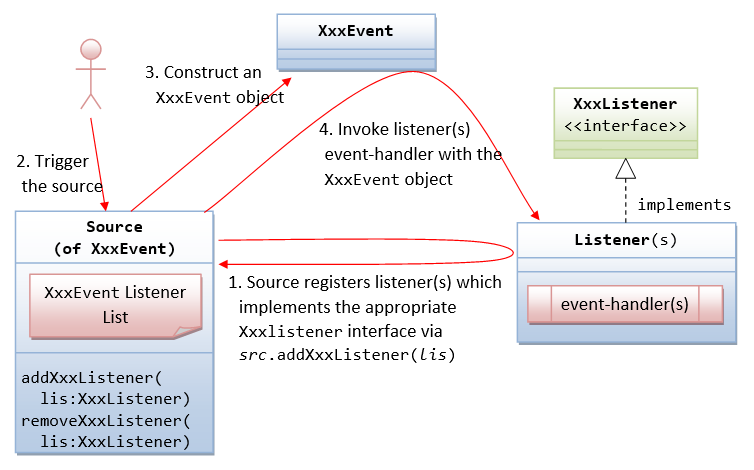
The sequence of steps is illustrated above:
- The source object registers its listener(s) for a certain type of event.
A source fires an event when triggered. For example, clicking a
Buttonfires anActionEvent, clicking a mouse button firesMouseEvent, typing a key firesKeyEvent, and etc.How the source and listener understand each other? The answer is via an agreed-upon interface. For example, if a source is capable of firing an event called
XxxEvent(e.g.,ActionEvent). Firstly, we need to declare an interface calledXxxListener(e.g.,ActionListener) containing the names of the handler methods (recall that aninterfacecontains onlyabstractmethods without implementation). For example, theActionListenerinterface is declared as follows:// An ActionListener interface, which declares the signature of the handlers public interface ActionListener { public void actionPerformed(ActionEvent evt); }Secondly, all
XxxEventlisteners must implement theXxxListenerinterface. That is, the listeners must provide their own implementations (i.e., programmed responses) to all theabstractmethods declared in theXxxListenerinterface. In this way, the listener(s) can response to these events appropriately. For example,// An example of MouseListener, which provides implementation to the event handler methods class MyActionListener implement ActionListener { @Override public void actionPerformed(ActionEvent evt) { System.out.println("ActionEvent detected!"); } }Thirdly, in the source, we need to maintain a list of
XxxEventlistener object(s), and define two methods:addXxxListener()andremoveXxxListener()to add and remove aXxxEventlistener from this list. For theActionEvent, the signature of the methods are:public void addActionListener(ActionListener lis); public void removeActionListener(ActionListener lis);
Take note that the
addXxxListenser()takes aXxxListenerobject as its sole parameter. In other words, it can only add objects of the typeXxxListener, and its sub-type. SinceXxxListeneris aninterface, you cannot create instance ofXxxListener, but need to create instance of a subclass implementing theXxxListenerinterface.In summary, we identify the source, the event-listener interface, and the listener object. The listener must implement the event-listener interface. The source object then registers listener object via the
addXxxListener(XxxListener lis)method. - The source is triggered by a user.
- The source create a
XxxEventobject, which encapsulates the necessary information about the activation. For example, the(x, y)position of the mouse pointer, the text entered, etc. - Finally, for each of the
XxxEventlisteners in the listener list, the source invokes the appropriate handler on the listener(s), which provides the programmed response.
In summary, triggering a source fires an event to all its registered listeners, and invoke an appropriate handler of the listener.
4.1 java.util.EventObject
All event objects extends java.util.EventObject, which takes the source object in this constructor, and provides a getSource() method.
// Constructor
public EventObject(Object source)

// Method
public Object getSource()
Take note that the constructor takes an Object; and getSource() returns an instance of type Object. You may need to downcast it back to its original type.
4.2 ActionEvent & ActionListener
An ActionEvent is fired, when an action has been performed by the user. For examples, when the user clicks a button, chooses a menu item, presses enter key in a text field. The associated ActionListener interface declares only one abstract method, as follows:
public interface ActionListener extends java.util.EventListener {
   public void actionPerformed(ActionEvent evt); // called-back when an action has been performed
}
From the ActionEvent argument evt, you may use evt.getActionCommand() to get a String related to this event, for example, the button's label, the String entered into the textfield. This is particularly useful if the same ActionEvent handler is used to handle multiple source objects (e,g., buttons or textfields), for identifying the source object that triggers this ActionEvent.


Comments
Post a Comment